
Ah, the Megger MFT1552, a true workhorse of the sparky world. Whether it's RCD testing, no-trip Zs measuring, continuity checking and more, you know the MFT1552 will always be there for you... until it's not.
Okay, this article is of no use at all to non-electricians who have never heard of, let alone spent a fat wedge of cash on, a Megger multi function tester. It's also true that the good ol' 1552 is a bit long in the tooth and plenty of flashier models are now made by Megger, Fluke, Seaward, Kewtech, Metrel, TIS, Martindale, Ethos and others, so when you find your trusty MFT malfunctioning it's more likely that you'll spend out your hard earned beans on something whizzy & new than face the three-digit repair costs of sending back to Megger to make right.
And that's exactly what my old mukker Nigel at NKM Electrical did when he found the selector switch of his 1552 mis-selecting. It's a common problem, but what if I told you it was an easy repair requiring only a screwdriver, a knife and half an hour of your time?
Yes, put down your gin spritz, you heard me right.
It's important to point out a few things before we proceed however. Doing the following will invalidate any warranty and calibration. You also run the risk of causing further damage through cocking something up or failing to take antistatic precautions. Nigel has replaced his 1552, and I have one of my own, so it didn't matter if this particular unit lived or died. If done properly though, there's no reason why someone can't repair this common fault on their own malfunctioning 1552 so long as it's checked for correct operation and recalibrated afterwards.
No doubt Megger themselves would state that once you've pulled the thing apart then all bets are off when it comes to the future reliability and operation of the thing and that it shouldn't be trusted anymore for live results. But then, they would say that if you've just side-stepped a pricey repair bill for half an hour of their technician's time.
So, it being a cloudy bank holiday and with me suffering the ill-effects of a post Eurovision hangover (it just isn't possible to sit through it sober), it seemed like a good idea to see why Nigel's 1552 was misbehaving through its new habit of not selecting what was being selected.
Step 1: Carefully peel off the front label. This one came off easily and in one piece.
Step 2: Using a knife, ease out the selector dials and clean out the dirt and dust that has no doubt accumulated underneath!
Step 3: This is the likely cause of the trouble in our case. A gasket that is supposed to keep the crap out has deformed and come loose allowing the dust to get into the switch and interfere with the contacts.
Step 4: Remove the four indicated screws.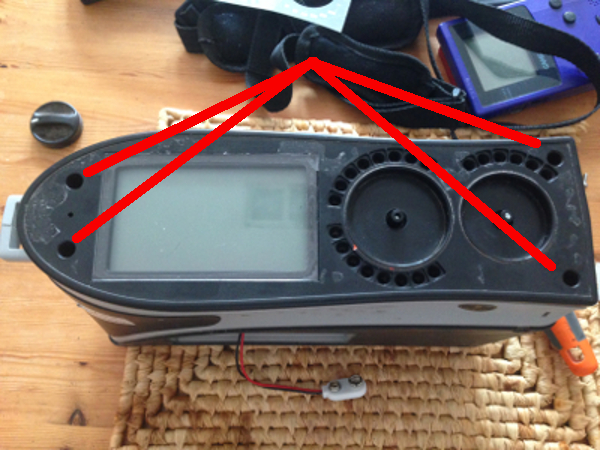
Step 5: The front facia can now be lifted out. It remains attached via a ribbon cable.
Step 6: Remove the two indicated screws and unplug the ribbon cable.
Step 7: The PCB can now be lifted out of the facia.
Step 8: The selector(s) can be dismantled by undoing the screw in their centre. Each selector has a top and a bottom half that sit on either side of the PCB. The contacts on the PCB and the three dimples on each side of the selector need to be cleaned of any dirt or dust that has crept in.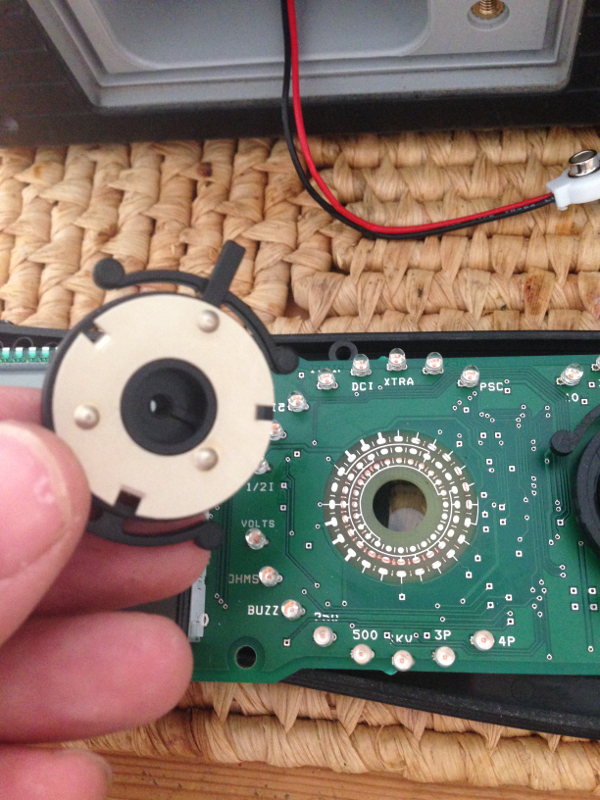
Step 9: Once cleaned up, the easiest way to reassemble is to place the selector back into the facia with it orientated so that the tab (red) and key (green) are in the positions shown. The correct placing is different for the RCD selector, but I forgot to photograph that, so you'll have to figure it out for yourselves kids, but here's a hint - the tab on the RCD selector sits between the two posts on the left side of this picture.
Step 10: Place the PCB back onto the facia. The rear half of the selector now needs to be placed back into position. The notch within the rear half (red) fits into the key from the front half (green). Once located, insert the screw to hold the selector together.
Step 11: When reassembled, both selectors should sit flat. If you've misaligned it during reassembly then it will be crooked and won't work. If you're happy that the switches appear to be seated correctly and working mechanically, put the two PCB screws back into place that were taken out in Step 6.
Step 12: Reassembly is the reverse of removal. Check for correct operation of the selector before putting back all the case screws and before supergluing the label back into place.
Reassembly has been performed minus the gasket which failed in the first place which means this 1552 is more susceptible to dust getting back in and eventually causing the same problem again, however once recalibrated it would make an ideal tester for an apprentice who needs something to play with.
This procedure details how I apparently solved the malfunction on this particular Megger, however I make no guarantees regarding the suitability of this guide for anyone else to follow. If you're not confident in your own ability to attempt such a repair, or if you find I missed out any steps in my hungover state that leaves you making things worse or unable to put it back together then that's unfortunate, but I'll be unable to provide assistance. This guide is subject to my usual disclaimer.

AFF1